Using the ESP8266 with Arduino Uno is one of the fundamental methods of connecting edge devices (aka. "things") to the internet. We will use a chip called the ESP8266 (this is a Wifi capable chip with a built-in antenna) with the Arduino Uno, for logging messages to an IoT Cloud platform. For the purpose of this demonstration we will use a free IoT platform called ThingSpeak. However, you are free to choose from AWS, Azure, Dweet, Particle, your own "bespoke" stuff or many more out there. I chose ThingSpeak because it was absolutely free (no Credit Card needed for signing up). However, the limitation of the ThingSpeak IoT platform, atleast the free stuff I am using here, is of accepting ONLY ONE incoming message per 15 seconds - so in one minute you will be able to send a maximum of 4 messages only.
A Word Of Caution
This is an advanced setup for connecting the ESP8266 with the Arduino Uno, not recommended without a good understanding first - one small mistake and the ESP8266 chip (3.3V) might get fried (if unfortunate). Using the ESP8266 with the Arduino (5V) is fundamentally different from using any other 5V compatible component, because of the multiple voltage levels involved in this circuit setup.
Dos & Don'ts
While setting up the ESP8266 with Arduino Uno, always use a separate power source for connecting the ESP8266 to the Arduino Uno. Do not use the 3.3V power supply from Arduino. The ESP8266 operates on 3.3V DC, whereas the Arduino Uno operates on 5V DC. The ESP8266 requires currents much greater (120 - 170 mA while transmitting wireless packets - refer Page 19 of the manufacturer's datasheet) than what can be supplied by an Arduino Uno 3.3V pin (~50mA - refer this for details). Hence you will have to grasp the following fundamentals.
- Using Multiple Power Sources in the same circuit - Powering the Arduino board from a 5 V power source and ESP8266 from a 3.3V power source.
- Common Grounding - How to give the Arduino board and the ESP8266 chip a common GROUND, even though they are powered from two different power sources?
- Voltage Division - How to reduce 5V to 3.3V using the Voltage Division Technique for connecting the Arduino Tx Pin (5V) to ESP8266 RXD Pin (3.3V)?
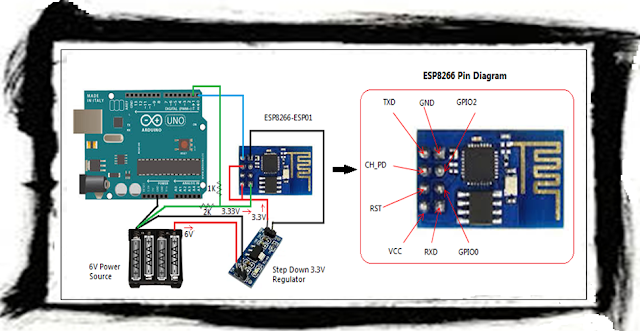
In the following sections we will see how to actually hook up the ESP8266 with the Arduino Uno, in the wiring diagram below.
Hardware Needed
- Arduino UNO
- USB A to B cable (for programming the Arduino UNO)
- Breadboard
- Jumper Wires (M2M, M2F and F2F)
- ESP8266
- FT232RL USB to TTL Converter (for configuring the ESP8266)
- USB A to mini B cable (for connecting the FT232RL USB to TTL converter)
- DC/DC Step-Down 3.3V Converter (alternately you may use an AMS1117 3.3V regulator and some capacitors, but it is a bit advanced)
- AAA Battery Holder (for 4 x 1.5V batteries)
- 4 Pcs. of 1.5V Batteries
- Soldering Kit (you may need this to join the power supply wires to some header pins)
- Multimeter (to check the output of the 3.3V voltage converter really 3.3V or not...I am a bit paranoid while working with off the shelf electronic components)
Software Needed
- Arduino IDE
- IoT Cloud Channel
Here onwards, we will proceed gradually, one step at a time, for connecting the ESP8266 with Arduino Uno. Basically we will have to take the following steps in order to push data into the IoT cloud platform:
- Configure the ESP8266
- Wire the ESP to the Arduino
- Setup a Channel (for each edge device) in the IoT Cloud
- Write a C program for using the ESP8266 from the Arduino board
Configuring the ESP8266
This is a very important step in this setup and must be performed before connecting the ESP8266 with the Arduino Uno. The baud rate of your ESP8266 should be set to 9600, so that you can communicate with it via your Arduino IDE's Serial Monitor and also via the Software Serial while issuing AT commands for connecting from the C program to the internet. You can refer to the steps to configure the ESP8266 hrer.
Wiring the ESP8266 with the Arduino UNO
While wiring the ESP8266 with the Arduino Uno, exercise caution while connecting this setup. Make sure that any voltage into the ESP8266 chip is around 3.3 volts. Use a multimeter to double check the voltage. The remaining setup shown below is self-explanatory for wiring the ESP8266 with the Arduino Uno.
 |
| Figure 4 - Wiring of ESP8266 with Arduino Uno |
Wire the ESP8266 to the Arduino UNO as described below:
- Arduino TX --> ESP RXD (using voltage division method) and then into Common GND - the GREEN line shown in the picture
- ESP TXD --> Arduino RX (no voltage shifting needed) - the BLUE line shown in the picture
- Arduino GND --> Common GND (-ve Terminal of power source)
- ESP GND --> 3.3V Step-Down Regulator GND
- ESP VCC & CH_PD --> 3.3V Step-Down Regulator VOUT
- 3.3V Step-Down Regulator VIN --> +ve Terminal of power source
- 3.3V Step-Down Regulator --> -ve Terminal of power source
Setting up a ThingSpeak Channel
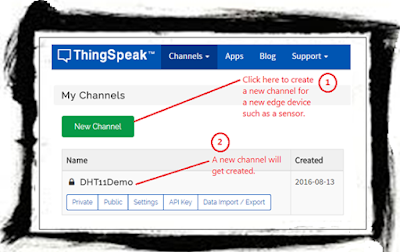
After connecting the ESP8266 with Arduino Uno, the next thing that you will have to do is to create an account in an IoT Cloud platform, so that you may use it to log the data from the edge device (node MCU as they call it sometimes) or sensor, using the ESP8266 with Arduino Uno. For this purpose, I will be using www.ThingSpeak.com to demonstrate how the setup a channel to receive data from a device. The term "channel" in the context of an IoT cloud simply means an endpoint (an exposed web service and/or web service method) to receive data from the sensor. Hence for each device you will have to create a corresponding channel. I will write a dedicate post on setting up and configuring the ThingSpeak account and channel, at a later time. For now I will provide the minimum information needed to log data from a sensor to the cloud. After creating your account, create a New Channel and then configure it by following the on screen instructions. Once the new channel is created it will appear in your account's My Channels dashboard (Channels > My Channels), as shown below.
 |
| Figure 5 - ThingSpeak Channel for receiving data from ESP8266 with Arduino Uno |
Next, step is to find out the how to log and read data to and from this channel. ThingSpeak provides several ways to integration data, such as:
- Simple GET and PUT using URLs from a browser
- Simple GET and PUT from JavaScript or any other code
- It also provides a library (the C header file - ThingSpeak.h) for use with an Arduino Uno
Logging Data:
https://api.thingspeak.com/update.json?api_key=<your-write-api-key>&field1=58
Reading Data (this URL format will return the last logged data row):
https://api.thingspeak.com/channels/<your-channel-id>/feeds.json?key=<replace-with-your-api-key>&results=1
The C Program for Posting Data to ThingSpeak
Use the following C program for using the ESP8266 with Arduino Uno, to read the sensor data and then log it to the ThingSpeak IoT cloud. In this example, we are not going to use either the ThingSpeak API or the ESP8266 API for Arduino. We will use only AT commands.
Conclusion
In conclusion, using the ESP8266 with the Arduino Uno will pose some practical challenges for the IoT prototypist. Specially, using multi-voltage devices in the same circuit. I hope you find this post useful. Do leave your comments and experiences below. I would love to hear from you!
Cheers!
KBRC

No comments:
Post a Comment