 |
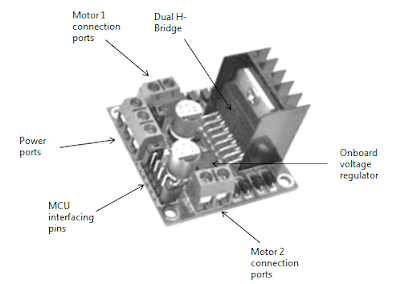
| Figure 1 - An L298N dual H-bridge module with Arduino Uno |
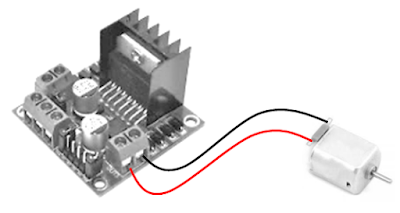
As shown above, there are two motor ports on either side of the L298N dual H-bridge module. A typical DC motor has two terminals. These terminals have to be connected with the motor connection ports as shown below.
 |
| Figure 2 - L298N Dual H-bridge with DC Motor |
 |
| Figure 3 - L298N Dual H-bridge power pins with Arduino Uno |
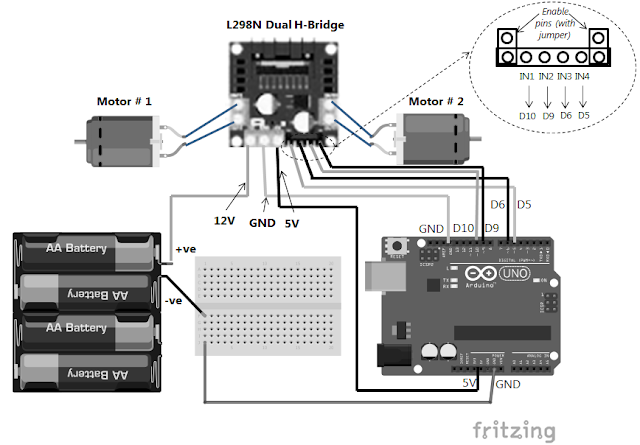
You will have to use either the 12V or the 5V power port for powering the module - don't use both together. The 12V port is to accept external power supply ranging from 5 - 35 volts - the module has an in-built 5 volt power supply unit to manage the power at the required level. Whereas the 5V port can be used for connecting to Arduino's 5V pin. The GND port should be used to tie the circuit with a common ground.
Parts Needed
Now that we know the bare minimum of the L298N dual H-bridge module, let us look at how to interface it with the Arduino Uno. As a first step, you will need the following parts for interfacing a L298N dual H-bridge motor driver module with the Arduino Uno:
- Arduino Uno R3 board
- USB-A to USB-B cable
- A half/full sized breadboard
- A L298N Dual H-Bridge motor driver module
- 2 normal/geared DC motors
- 4 x 1.5 volt AA alkaline batteries (you can use as per avalability)
- Battery holder case
- Some jumper wires
The Circuit
The breadboard setup for connecting the L298N dual H-bridge motor driver module with the Arduino Uno is shown below for reference.
 |
| Figure 4 - Interfacing L298N Dual H-bridge with Arduino Uno |
The Code
After the circuit has been built, use the following C sketch to control two DC motors via the L298N dual H-bridge motor driver module with the Arduino Uno.
// Motor # 1 (left side of diagram)
const int IN1 = 5;
const int IN2 = 6;
//Motor B (right side of diagram)
const int IN3 = 9; // change to 10 if running robot wheels
const int IN4 = 10; // change to 9 if running robot wheels
int speed = 190; // maximum 255, try lower value for non-geared motors
void setup()
{
Serial.begin(9600);
pinMode(IN1, OUTPUT);
pinMode(IN2, OUTPUT);
pinMode(IN3, OUTPUT);
pinMode(IN4, OUTPUT);
}
void loop()
{
char ch = 0;
ch = Serial.read();
if(ch == '1')
{
// turn Motor # 1 in one direction
analogWrite(IN1, speed);
analogWrite(IN2, 0);
delay(500);
analogWrite(IN1, 0);
}
if(ch == '2')
{
// turn Motor # 1 in the other direction
analogWrite(IN1, 0);
analogWrite(IN2, speed);
delay(500);
analogWrite(IN2, 0);
}
if(ch == '3')
{
// turn Motor # 2 in one direction
analogWrite(IN3, speed);
analogWrite(IN4, 0);
delay(500);
analogWrite(IN3, 0);
}
if(ch == '4')
{
// turn Motor # 2 in the other direction
analogWrite(IN3, 0);
analogWrite(IN4, speed);
delay(500);
analogWrite(IN4, 0);
}
if(ch == '5')
{
// turn both motors at once in one direction
analogWrite(IN1, speed);
analogWrite(IN2, 0);
analogWrite(IN3, speed);
analogWrite(IN4, 0);
delay(500);
analogWrite(IN1, 0);
analogWrite(IN3, 0);
}
if(ch == '6')
{
// turn both motors at once in the other direction
analogWrite(IN1, 0);
analogWrite(IN2, speed);
analogWrite(IN3, 0);
analogWrite(IN4, speed);
delay(500);
analogWrite(IN2, 0);
analogWrite(IN4, 0);
}
if(ch == '7')
{
// stop all motors, whether running or not running
analogWrite(IN1, 0);
analogWrite(IN2, 0);
analogWrite(IN3, 0);
analogWrite(IN4, 0);
}
}
Interesting Applications
The L298N dual H-bridge motor driver module is frequently used for controlling motors in:
- Robotic vehicles and robot arms
- Lighting projects for controlling brightness
- Other innovative moving devices
If you liked this post, then your encouragement by performing a G+ and a share is most welcome and highly appreciated!

No comments:
Post a Comment