The ESP8266 baud rate must be changed to 9600 before connecting the ESP8266 with the Arduino Uno. The baud rate of your ESP8266 should be set to 9600, so that you can communicate with it via your Arduino IDE's Serial Monitor and also via the Software Serial while issuing AT commands for connecting from the C program to the internet.
By the way, setting up the FTDI FT232RL USB to TTL Converter is a separate topic altogether. You will have to set up the USB to TTL converter before you can use it to configure the ESP8266. You can read my detailed post of setting up the FTDI FT232RL USB to TTL Converter.
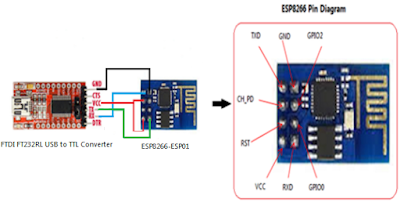
For changing the baud rate of the ESP8266 connect the chip with the USB to TTL converter as shown below. Also note that there is another way of using your Arduino Uno board to configure the ESP8266 chip, instead of the USB to TTL converter - in which case you do not need to use the USB to TTL FTDI chip - will write about it in a later post.
Caution: The FTDI FT232RL USB to TTL Converter I used had a jumper to select voltage level between 3.3V and 5V. Before connecting, I had switched the jumper to the 3.3V level. If your USB to TTL converter does not come with 3.3V, then you must use the voltage divider technique to obtain 3.3V on the Vcc and Tx pins.
 |
| Figure 1 - Configure ESP8266 baud rate using USB to TTL converter |
Connect the ESP8266 to your PC, via the USB to TTL converter as explained below.
- PC USB A --> USB to TTL FTDI
- USB-to-TTL FTDI TX --> ESP8266 RXD (via voltage divider, if 3.3V mode not available)
- USB-to-TTL FTDI RX --> ESP8266 TX
- USB-to-TTL FTDI GND --> ESP8266 GND
- USB-to-TTL FTDI VCC --> ESP8266 VCC and CH_PD (via voltage divider, if 3.3V mode not available)
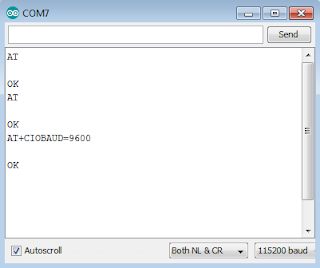
Next in order to configure ESP8266 chip's baud rate, fire up the Arduino IDE and browse to the Serial Monitor. In the serial monitor, you will have to perform some trial and error to find out the existing baud rate of your ESP8266 chip. Set the line ending to "Both NL & CR". Then start with the highest rate of 115200, then type the command AT in the Serial Monitor and send it to the ESP8266 chip. If the selected baud rate matches the you will see OK displayed as a reply in the Serial Monitor window. Repeat this process of changing the baud rate from the Serial Monitor and pinging the ESP8266 chip with the AT command, until you receive OK as a reply. In my case (shown below) the factory set baud rate was 115200.
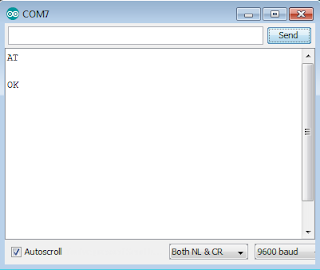
If the baud rate matches with 9600, then no further action is required and you may proceed with setting up the ESP8266 with the Arduino Uno. If the matching baud rate is something other than 9600, then you will have to change the baud rate of your ESP8266 chip by issuing the following AT command (AT+CIOBAUD=9600) in the Serial Monitor window.
 |
| Figure 2 - Finding Factory Set Baud Rate of ESP8266 |
If the baud rate matches with 9600, then no further action is required and you may proceed with setting up the ESP8266 with the Arduino Uno. If the matching baud rate is something other than 9600, then you will have to change the baud rate of your ESP8266 chip by issuing the following AT command (AT+CIOBAUD=9600) in the Serial Monitor window.
 |
| Figure 3 - Change Baud Rate of ESP8266 |
This is how you configure the baud rate of your ESP8266 chip! Just to be sure that the baud rate was indeed changed, issue the command AT in the Arduino Serial window. You should receive OK as a reply if everything went successfully so far. Otherwise repeat the AT command to change the baud rate.

Hello. I followed your well-written instructions exactly, and it looked like everything worked properly. However, I still could not communicate with my project. Then, I went back to check my settings using the "AT" command, and the ESP8266 won't respond at any baud rate. It looks like this module is bricked. I read a few different articles and attempted to re-flash it...no luck so far. Just wanted to let you know about my problem. Thanks for your write-up. The instructions probably works fine on certain ESP8266s depending on the flash chip, etc.
ReplyDeleteOn a side note, I ordered a few more of these ESP8266 from a different vendor and will try again.
ReplyDeleteJust a follow-up to anyone else reading this guide...a friend of mine was able to reset my ESP8266 after the command "AT+CIOBAUD=9600" apparently bricked it. Also, I read NOT to use the command "AT+IPR=9600" since that could also brick the module. As of this posting date, the correct command to set the baud rate for the current session is "AT+UART_CUR=9600,8,1,0,0" while "AT+UART_DEF=9600,8,1,0,0" will change it "permanently". Obviously you change the parameters/arguments as needed for your project. Good luck
ReplyDeletethanks, it worked
Deletehi, i have question regarding my coding.. i been try AT command at baud rate 115200 and it work well but i try to set the baud rate to 9600 and after that it wont response and it seem that the baud rate changed permanently so if there a way to change the baud rate to 115200?
ReplyDelete