In the previous post we saw how to measure temperature using the DHT11 temperature sensor with the Arduino UNO. In this post we will discuss and see how to use a basic temperature sensor for detecting higher than normal or "fire-like" heat/temperatures (a potential emergency). As usual we will use our favorite prototyping equipment, the Atmel chip based Arduino Uno (you may use an 8-bit PIC family processor also as an alternative, but then you will have to use MPLAB for burning the C programs and some USB to TTL programmer hardware) for writing the embedded C programs to interface with the sensors.
Which Temperature Sensor should I use?
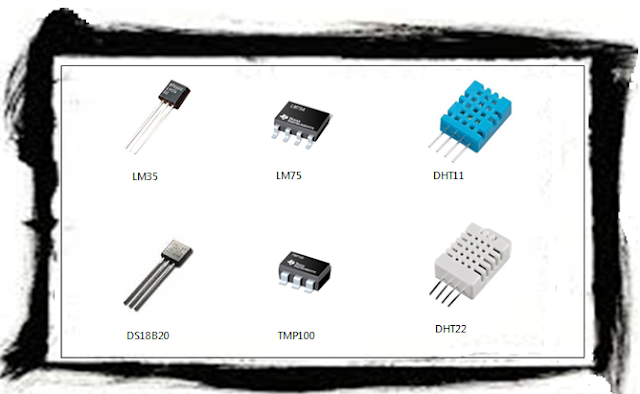
Well, it is tricky. There are a myriad of temperature sensors available in the industry that may be used with an Arduino UNO. Each of them differ mainly on two grounds: accuracy and operating conditions. If you are planning the devise a particular IoT solution at a particular geographical location or weather condition, then carefully evaluate the datasheets of these sensors. A snapshot image of six commonly used temperature sensors is provided below.
 |
| Figure 1 - Commonly used Temperature sensors. |
How to connect/wire a DHT11 Temperature sensor with an Arduino?
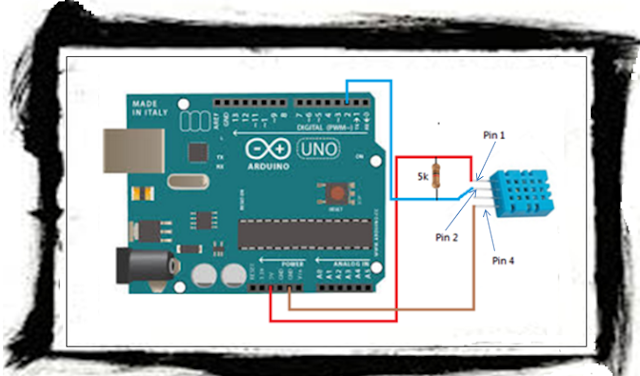
We will be using the DHT11 temprature sensor with Arduino UNO for our experiment. Given below is my account of using this sensor. The DHT11 sensor has 4 pins (remember Pin 3 in not used), the wiring for the sensor and the Arduino board is shown below. One important point to note is the mention of connecting a pull-up resistor, as shown in the snapshot taken from the DHT11 datasheet in the Figure below. This point is a source or some confusion, as I found in a lot of forums over the internet. However, it is as simple as just joining Pin 1 to Pin 2 using a 5K resistor (as shown in Figure 3 below), if the length of the cables is below 20 mtrs (which was the case in my experimental setup).
 |
| Figure 2 - Suggested Wiring from DHT11 Datasheet |
 |
| Figure 3 - Actual wiring of a DHT11 temperature sensor with an Arduino board |
You should connect them as follows:
DHT11 Sensor Arduino
---------------- ----------
Pin 1 ---> 5V
Pin 2 ---> Pin 2
Pin 3 ---> (not used)
Pin 4 ---> GND
NOTE - Remember to connect the resistor between Pin 1 and Pin 2 of the DHT11 sensor.
Embedded C Program for reading the DHT11 Temperature sensor
There is a pre-requisite of installing the DHT11 library, for using the DHT11 temperature sensor with Arduino UNO. Follow these steps to first install the DHT library. You will need this library in order to include the DHT.h file in the sketch below.
- Launch the Arduino IDE.
- Navigate to Sketch > Include Library > Manage Libraries...
- The Library Manager window will pop up.
- In the Library Manager window, search for DHT and install the required library. The library that I choose to install is shown below.
 |
| Figure 4 - Screenshot of Installed DHT Sensor Library in Arduino IDE Library Manager |
Next you may use the following sketch for reading values from the DHT11 temperature sensor with Arduini Uno. The below code reads the DHT11 temperature sensor values at 5 second intervals and checks whether the temperature exceeds 65 degrees celcius (or 149 degrees farenheit). However, proper calibration and consultation with fire experts is necessary for a working threshold for fire temperatures.
Conclusion
To conclude this post, we have seen how yu may use a DHT11 temperature sensor with the Arduino UNO platform. Once the alert has been detected, you will have to take some suitable action such as (but not limited to):
- Sounding an alarm
- Posting the alert to an IoT cloud platform
- Activating some defence mechanism (such as sprinklers in case of fire)
- Sending SMS and calling phone numbers

No comments:
Post a Comment