Showing posts with label Arduino. Show all posts

How to Use a Vibration Sensor or Shake Switch with Arduino Uno

In this post we will look at how to use a Vibration Sensor (also known as a Shake Switch) with the Arduino Uno. A common Vibration Sensor or Shake Switch used with the Arduino Uno has a technical model number known as SW-18015P or SW-18020P. We can also refer to them as SW-180 series Vibrator Sensors or Shake Switches.

Vibration Sensor or Shake Switch SW-18015P / SW-18020P
Figure 1 - Vibration Sensor or Shake Switch SW-18015P / SW-18020P


As shown above, a Vibration Sensor or Shake Switch looks like a cylindrical capacitor in shape.

The Vibration Sensor or Shake Switch
Inside the Vibration Sensor or Shake Switch there is a complex mechnical spring system wound around a central shaft. The following diagram based on the SW-180 vibration sensor series datasheet depicts the working principle of a vibration sensor.

Working principle of a Vibration sensor or Shake switch
Figure 2 - Working principle of a typical Vibration sensor or Shake switch


The internal spring mounted system moves when the sensor is acted uopn by external stimuli. The resultant movement within the Vibration Sensor or Shake switch results in a change in electrical voltage. This change in voltage can be measured by any micro-controller unit such as an Arduino Uno. Let us see how in the next section.

Parts Needed for Vibration Senbsor or Shake Switch with Arduino
You will need the following items for using a Vibration sensor or Shake switch with the Arduino Uno:
  1. Arduino Uno R3 board
  2. USB-A to USB-B cable
  3. A SW-180 series vibration sensor or shake switch
  4. A breadboard
  5. Some jumper wires

The Breadboard Circuit for Vibration Senbsor or Shake Switch
The breadboard setup for connecting the vibration sensor with the Arduino Uno is shown below for reference.

Using Vibration Sensor (Shake Switch) with Arduino Uno
Figure 3 - Using Vibration Sensor (Shake Switch) with Arduino Uno


The connection are explained below for easy understanding.

  1. Connect one leg of the vibration sensor or Shake switch with Arduino Uno's analog pin A5
  2. Connect the other leg of the vibration sensor or Shake switch with Arduino Uno's 5V power supply pin

The Arduino C Sketch for Vibration Senbsor or Shake Switch
After the circuit has been built, use the following C sketch to interface the Vibration sensor or Shake switch with the Arduino Uno. The main point to note here is that when the sensor does not vibrate then the analog values will be greater than 1022. So in order to react to vibration pay attention to the logic writen in the if statement below.

// variable to store analog value read from the vibration sensor
int sensorReading;
int sensorPin = A5;

void setup()

{
   Serial.begin(9600);
}

void loop()

{
   sensorReading = analogRead(sensorPin);

   // normally when nothing is vibrating or shaking

   // the sensor values on the analog pin A5
   // will be between 1023 to 1024
   if (sensorReading < 1022)
   {
      Serial.print("Things started moving: ");
      Serial.println(sensorReading);
   }

   // check every 5 seconds
   delay(5000);
}

Interesting Applications of the Vibration Senbsor or Shake Switch
The SW-180 series vibrations switch can be utilized for building some interesting real worl applictaions such as:
  1. Anti-theft alarms
  2. Monitoring moving machinery/equipment
  3. Instruments / Toys
  4. Sport Equipments
Conclusion
This is how a SW-180 series vibration switch or shake switch is interfaced with an Arduino Uno.
This example has multiple fundamentals such as: reading analog I/O, fundamentals of interfacing with sensors, using sensor datasheets, using the Serial Monitor for sketch debugging and so on. These and many other things have been covered in detail in my book "Learn Arduino Prototyping in 10 Days".


If you liked this post, then your encouragement by performing a G+ and a share is most welcome and highly appreciated!

Arduino - How to setup and start programming?


<< Previous Post | Visit my Traditional Programming Blog | Next Post >>

Well, much has been written already online and in print media regarding setting up and writing  programs for the Arduino. However, I decided to write about the bare basics, primarily for the sake of completeness of my blog and also for sharing my experience on a particular platform. Hence I will not reinvent the wheel, instead point you to relevant technical literature on the Arduino Foundation's website for the purpose of the first time setup, and then add some personal observations that may help you getting started additionally.

Bare Basics of First Time Setup

Depending upon the operating system of your computer, you may visit one of these links for a detailed step-by-step guide for setting your Arduino UNO R3 board and starting to write the first program.

Windows - https://www.arduino.cc/en/Guide/Windows
Mac - https://www.arduino.cc/en/Guide/MacOSX
Linux - https://www.arduino.cc/en/Guide/Linux

Provided below is my experience of setting up the Arduino on my Windows 7 laptop:

  • While the framework gets installed there is no need to connect the Arduino board to your computer.
  • After the installation is completed, and you connect the board for the first time, wait a bit for Windows to install the board drivers automatically.
  • After the drivers get auto-installed by Windows, launch the Arduino IDE (you may find the shortcut on your desktop).
  • Once the IDE is open, navigate to Tools menu and perform the Board and Port selections as instructed in the setup steps.
  • Just to verify I double checked the board connection by navigating to the menu Tools > Get Board Info. If everything has been completed successfully, you should receive a pop-up with the board details such as Serial Number, etc.
  • That is all, for the first time setup!
Moving ahead, I found that the board usually got auto detected after I plugged in my board to my laptop. However, sometimes you may notice that the board is not getting auto-detected, and this usually happens if you have opened your IDE first followed by plugging in the board. However, there is nothing to worry about, just re-launch the IDE and the board should get auto-detected.

Arduino Program Structure & Execution

All Arduino C programs need at least two functions: setup() and loop(), as shown below in the Arduino IDE. To understand what is going on, we must appreciate these three things:

Figure 1 - Basic structure of an Arduino C Program

  • The C program, after getting loaded into the Arduino board, keeps running in an infinite loop, until the board is powered off.
  • The setup() function is executed once, every time when the Arduino board is powered up. So all one time configuration/setup related code has to be written here. Think of it like a constructor.
  • The loop() function keeps getting invoked infinitely. Whatever you write here will keep getting executed infinitely, until the power supply to the Arduino board is turned off.

Some advice for your Hello World with LED Blinking

Right after the installation you will be tempted to try the LED blinking lesson that comes with the installation guide. If you are blinking the onboard LED on PIN 13 then is should be straight forward. However, if you try to blink an external off-board LED, and if the LED does not blink for the first time, then do not get dis-heartened. There could be several reasons for the LEDs not working such as:
  • Faulty LED (most common and in my case this is what had happened)
  • Defective jumper wire cable (this also happened in my case)
  • Defective Breadboard section rails (also common)
  • Defective resistor
  • Faulty circuit arrangement
Caution: Please remember to add a resistor to the LEDs always, otherwise they will burn out.

Cheers!
KB

Arduino - Easy Buyer's Guide & Getting Started


<< Previous Post | Visit my Traditional Programming Blog | Next Post >>

This post is primarily focused on getting started with the Arduino. There are many versions of the Arduino. You have 8-bit and 32-bit versions. Then there is the Nano, Mini, Uno, Mega. For most developmental purposes the Arduino UNO R3 can be used.

While ordering the Arduino

It would be best to order an
Arduino UNO R3 Starter Kit that contains everything you need to get started with the Arduino. Double check whether your kit includes at least the bare minimum such as:

Figure 1 - A typical Arduino Starter Kit


  • The Arduino UNO R3 mainboard
  • An USB A to B connector cable. USB Type A is the port on a computer while USB Type B is the port on the Arduino mainboard.
  • 1 Breadboard
  • Some Jumper Wires
  • Resistors, Transistors and Diodes
  • Optional - Most vendors usually also provide some LEDs and Buttons
  • Optional - Some vendors may or may not provide sensors (temperature) and actuators (motors)
  • If you get more from a vendor for the same price, then better!

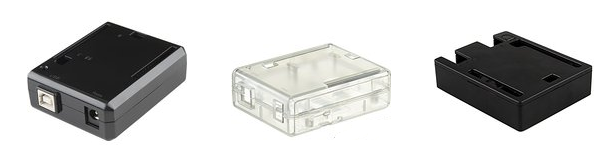
Go the extra mile and order an outer Protective Jacket/Box for your Arduino. It is an invaluable asset and will save you away from the constant risk of damaging your Arduino from external shocks and injury.

Figure 2 - Some varieties of Arduino Cases/Boxes/Enclosures

Also order an Anti-Static Wrist Band for your Arduino. Believe me it will go miles in saving your precious electronics from static electric discharge from contact with your body (specially if you intend to work out of dry and cold weather conditions).

Figure 3 - Some varieties of Anti-Static Wrist Bands/Straps

Setting up and taking care of your Arduino

Once you have received your kit it becomes very important to handle the Arduino with care. Since there are a lot of delicate electronics involved, you will have to be very careful.

First, make sure you are free of static electricity. Touch some metal before handling the Arduino. Also wear your Anti Static wrist band for precaution.

The second important step is to encase your Arduino in the protective outer Jacket/Box. Believe me, I learnt it the hard way - don't leave your Arduino mainboard bare on your table. There are many ways it can get impacted from external influences.

And at last, the golden rules: be gentle when plugging in the jumper wires into the Arduino pins; and avoiding any liquids near or above the surface level of the Arduino mainboard. Also store the Arduino in a dry and moderate temperature. Avoid heat and humidity to keep your prized powerhouse chip going on and on for years of innovation to trickle out of your grey cells.

Cheers!
KB